
Crispy Cotton Candy Cheesecake Bombs

Golden, fried pockets of creamy cheesecake tucked inside flaky biscuit dough, rolled in sugar and finished with a tuft of fluffy cotton candy — a playful dessert that’s perfect for parties and special occasions.

This recipe began as a playful experiment the first time I wanted to surprise my niece at a summer backyard party. I had a leftover can of refrigerated biscuit dough and a tub of cream cheese in the fridge, and the idea of wrapping a sweet, creamy center in dough and frying it seemed irresistible. The result was a crisp, golden shell that crackled on the outside and yielded to a luxuriously smooth cheesecake center. The tiny burst of cotton candy flavor folded into the filling and the tuft of sugar floss on top turned an ordinary fried treat into a whimsical dessert that made everyone smile.
What makes these treats special is the contrast — the initial crunch of the fried biscuit followed by the cool, creamy filling, with an extra lift from the cotton candy aroma. I discovered a few technique points along the way: chilling the filling helps it hold shape during wrapping, sealing the dough snugly prevents leaks, and maintaining oil temperature keeps the exterior thin and ultra-crisp rather than greasy. These are now my go-to steps whenever I want a sweet, nostalgic plate that’s as much fun to serve as it is to eat.
Why You'll Love This Recipe
- Playful presentation that’s perfect for celebrations and kid-friendly events — each is individually portioned for easy serving and sharing.
- Uses accessible pantry staples like refrigerated biscuit dough and cream cheese, making it quick to assemble without specialty ingredients.
- Ready to serve in under an hour: about 45 minutes active prep plus 10 minutes frying, ideal for last-minute desserts.
- Make-ahead friendly: the filling can be prepared a day ahead so you only assemble and fry before serving.
- Customizable sweetness and flavor: add more cotton candy extract for a stronger note or swap toppings to suit the season.
- Crowd-pleasing texture contrast with a warm, crunchy exterior and a cool, creamy center that melts in your mouth.
On the first afternoon I tested these, family members gathered around the fryer like moths to a porch light. We experimented with different sugar coatings and small tufts of colorful cotton candy. The consensus: slightly more cotton candy extract in the filling and a generous sugar coating made them irresistible. Seeing my dinner table filled with laughter and sugar-dusted cheeks convinced me these are worth keeping in the rotation for birthdays and summer gatherings.
Ingredients
- For the filling: 1 cup softened cream cheese (8 oz) — use full-fat for richest texture; Philadelphia brand gives a reliably smooth result.
- Powdered sugar: 1/2 cup adds structure and sweetness; sift to avoid lumps and keep the filling silky.
- Vanilla extract: 1 teaspoon — pure vanilla enhances the cheesecake notes; avoid imitation for best flavor.
- Cotton candy flavoring: 1/2 teaspoon — optional but recommended for that whimsical note; available online or in specialty baking shops.
- Whipped topping: 1/4 cup (stabilized whipped topping or whipped cream) to lighten the filling; Cool Whip works well if you need stability.
- Heavy cream: 2 tablespoons to loosen the filling slightly and add creaminess.
- For the dough: 1 package refrigerated biscuit dough (8-count) — Grands or similar brands work; use regular thickness biscuits for easier wrapping.
- All-purpose flour: 2 tablespoons for dusting to prevent sticking while rolling the rounds.
- For frying and coating: 4 cups vegetable oil for frying and 1 cup granulated sugar for rolling; keep powdered sugar on hand for a final dusting and fluffy cotton candy for topping.
Instructions
Prepare the filling: In a mixing bowl, beat the softened cream cheese until completely smooth using an electric mixer. Add the powdered sugar, vanilla extract, and cotton candy flavoring; beat until homogenous. Fold in the whipped topping and heavy cream to lighten the texture, aiming for a spreadable yet firm mixture. Chill in the refrigerator for 30 minutes to firm up so it holds shape when scooped. Flatten the dough rounds: Lightly dust your work surface with the all-purpose flour. Open the biscuit can and press each round with your palm, then use a rolling pin to flatten to about 1/8 inch thickness. Thin but not translucent — you want enough dough to seal but thin enough to fry crisp. Form the bombs: Scoop approximately 1 to 2 tablespoons of the chilled filling and roll into a small ball. Center the filling on a flattened biscuit round, then gather the dough edges up and over, pinching firmly to seal. Smooth by rolling between your palms into a neat sphere. Place finished bombs on a parchment-lined tray and refrigerate for 10 minutes to set. Heat the oil: Pour 4 cups of vegetable oil into a deep, heavy-bottomed pot and heat to 350°F (use a candy or deep-fry thermometer). Maintaining 350°F is crucial: too cool yields greasy bombs, too hot burns the exterior before the filling warms. Fry until golden: Working in batches to avoid temperature drops, gently lower bombs into the oil using a slotted spoon. Fry for 1 to 2 minutes per side, turning once, until a deep golden brown. Remove and drain on paper towels; rest for a minute before coating. Coat and finish: While still warm, roll each bomb in granulated sugar until fully coated. For extra cotton candy aroma, whisk a scant 1/4 teaspoon cotton candy flavoring into the sugar before rolling. Give a light dusting of powdered sugar and top with a small tuft of cotton candy just before serving.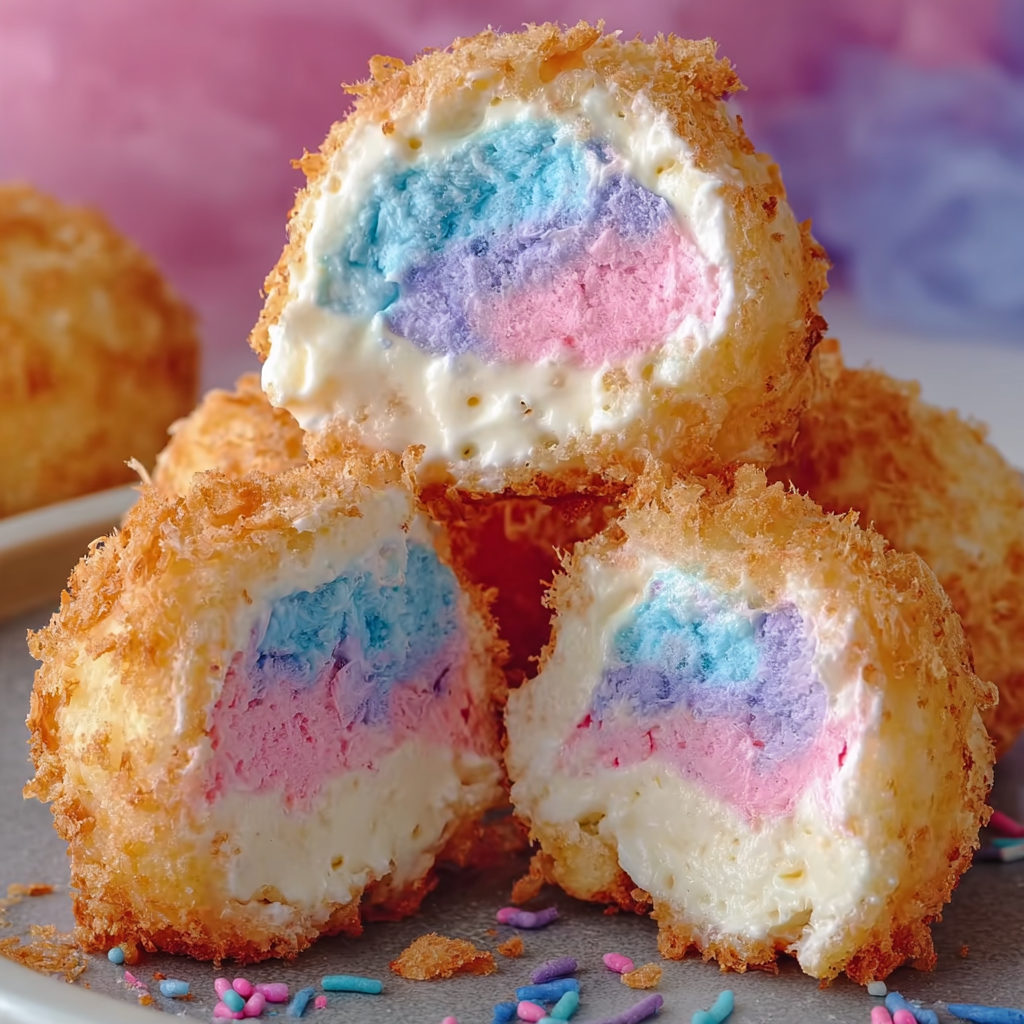
You Must Know
- These are best served immediately while the exterior is warm and crisp and the interior is cool and creamy; they lose the contrast if refrigerated uncovered.
- Maintaining oil at 350°F is critical; a digital thermometer helps avoid greasy or burned results and preserves the thin, crisp shell.
- If the filling softens too much while you work, return the shaped bombs to the refrigerator for 10 minutes before frying to reduce leakage risk.
- They freeze well before frying: shape the bombs, freeze on a tray until solid, then transfer to a freezer bag. Fry from frozen, adding 30 seconds per side to the fry time.
One of my favorite things about these is how they transformed a casual get-together into a moment — the cotton candy always draws smiles, and the contrast in texture keeps people coming back for seconds. Over the years I’ve learned small technical fixes: chilling the filling, sealing the dough well, and using a stable whipped topping to keep the filling light but firm. Those details are what make the final bite reliably delightful.
Storage Tips
These are at their best the day they’re made. If you must store leftovers, keep them covered in the refrigerator for up to 24 hours; the exterior will soften. For longer storage, freeze un-fried assembled bombs on a tray until firm, then transfer to an airtight container for up to 3 months. To reheat, fry from frozen for a few extra seconds per side or bake at 375°F for 8–10 minutes; the oven method yields a slightly less crisp exterior but is oil-free.

Ingredient Substitutions
If you prefer lighter filling, swap half the cream cheese for mascarpone for a silkier mouthfeel. For a lower-sugar version, reduce powdered sugar by a quarter cup and roll in a cinnamon-sugar blend with a sugar substitute in the coating. Use canned biscuit dough labeled ‘flaky’ for a puffier crust, or press out store-bought pizza dough for a chewier exterior. For a dairy-free twist, replace cream cheese and heavy cream with a firm coconut-based cream cheese and coconut milk whipped cream, but expect a slightly different texture.
Serving Suggestions
Serve with small ramekins of fruit coulis, chocolate sauce, or a berry compote for dipping. Bright, tart sauces provide pleasant contrast to the sweet filling. Garnish plates with fresh berries, a mint sprig, and an extra dusting of powdered sugar. These shine at birthday parties, summer BBQs, or as a surprising finale to a multi-course meal — the presentation is playful, so think colorful napkins and small dessert plates.
Cultural Background
This treat is inspired by American fairground and carnival culture where fried sweets and cotton candy reign supreme. It borrows the idea of fried dough pockets — common in many cuisines as filled fritters or doughnuts — and combines it with the cheesecake flavor profile. Cotton candy itself is a twentieth-century carnival invention that adds a scent- and texture-forward flourish to the otherwise classic technique of frying filled dough.
Seasonal Adaptations
For autumn, fold a teaspoon of pumpkin spice into the filling and swap the cotton candy for maple-flavored cotton candy or a drizzle of warm caramel. In winter, fold a tablespoon of finely chopped candied orange peel into the filling and swap sugar coating for a cinnamon-sugar blend. In spring and summer, top with brightly colored cotton candy and a berry compote to keep the presentation fresh and seasonal.
Meal Prep Tips
Make the filling up to 24 hours in advance and keep chilled. Assemble the bombs and freeze them on a tray for quick frying on the day you plan to serve. Label and store in freezer-safe containers; fry straight from frozen for party-ready timing. Keep extra cotton candy sealed in a cool, dry place and add it only at the last second to avoid melting into the warm pastry.
These golden, sugary bites are a delightful way to bring a bit of carnival magic to your kitchen. Whether you serve them warm for a crowd or as a surprise for family, they’re guaranteed to create moments of joy and a few messily happy faces. Give them a try and make them your own with different extracts, toppings, and sauces — the playful possibilities are part of the fun.
Pro Tips
Chill the filling for at least 30 minutes so it holds its shape when wrapped in dough.
Use a reliable oil thermometer and work in small batches to maintain 350°F for crisp results.
Seal the dough edges tightly and chill assembled bombs briefly to prevent leaks during frying.
Roll in sugar while warm for best adhesion and extra crunch.
This nourishing crispy cotton candy cheesecake bombs recipe is sure to be a staple in your kitchen. Enjoy every moist, high protein slice — it is perfect for breakfast or as a wholesome snack any time.
FAQs about Recipes
Can I make these ahead of time and freeze them?
Yes — assemble bombs and freeze them on a sheet until firm. Transfer to a freezer-safe bag and fry from frozen, adding about 30–45 seconds per side.
What temperature should I fry them at?
Use a thermometer and keep oil at 350°F. Too low and they absorb oil; too high and the exterior burns before the interior warms.
Tags
Crispy Cotton Candy Cheesecake Bombs
This Crispy Cotton Candy Cheesecake Bombs recipe makes perfectly juicy, tender, and flavorful steak every time! Serve with potatoes and a side salad for an unforgettable dinner in under 30 minutes.
Ingredients
Filling
Dough
Frying and Coating
Instructions
Prepare the filling
Beat softened cream cheese until smooth. Add powdered sugar, vanilla, and cotton candy flavoring and blend until combined. Fold in whipped topping and heavy cream until light and slightly firm. Chill 30 minutes to set.
Flatten the dough rounds
Dust work surface with flour. Flatten each biscuit round to about 1/8 inch thick using your palm or a rolling pin, keeping them thin enough to fry crisp but thick enough to seal.
Assemble the bombs
Scoop 1 to 2 tablespoons of chilled filling, roll into a ball, and place in center of flattened dough. Bring edges together, pinch to seal completely, and roll between palms to smooth. Chill assembled bombs 10 minutes.
Heat oil to 350°F
Pour 4 cups vegetable oil into a deep pot and heat to 350°F. Use a thermometer to ensure stable temperature for even frying and optimal crispness.
Fry until golden
Working in batches, lower bombs into oil and fry 1 to 2 minutes per side until deep golden brown. Remove with a slotted spoon and drain on paper towels to remove excess oil.
Coat and serve
While warm, roll each bomb in granulated sugar (mix in extra cotton candy flavoring if desired). Dust lightly with powdered sugar and top with a small tuft of cotton candy just before serving.
Last Step: Please leave a rating and comment letting us know how you liked this recipe! This helps our business to thrive and continue providing free, high-quality recipes for you.
Nutrition
Did You Make This?
Leave a comment & rating below or tag
@homecookbites on social media!
Categories:
You might also like...
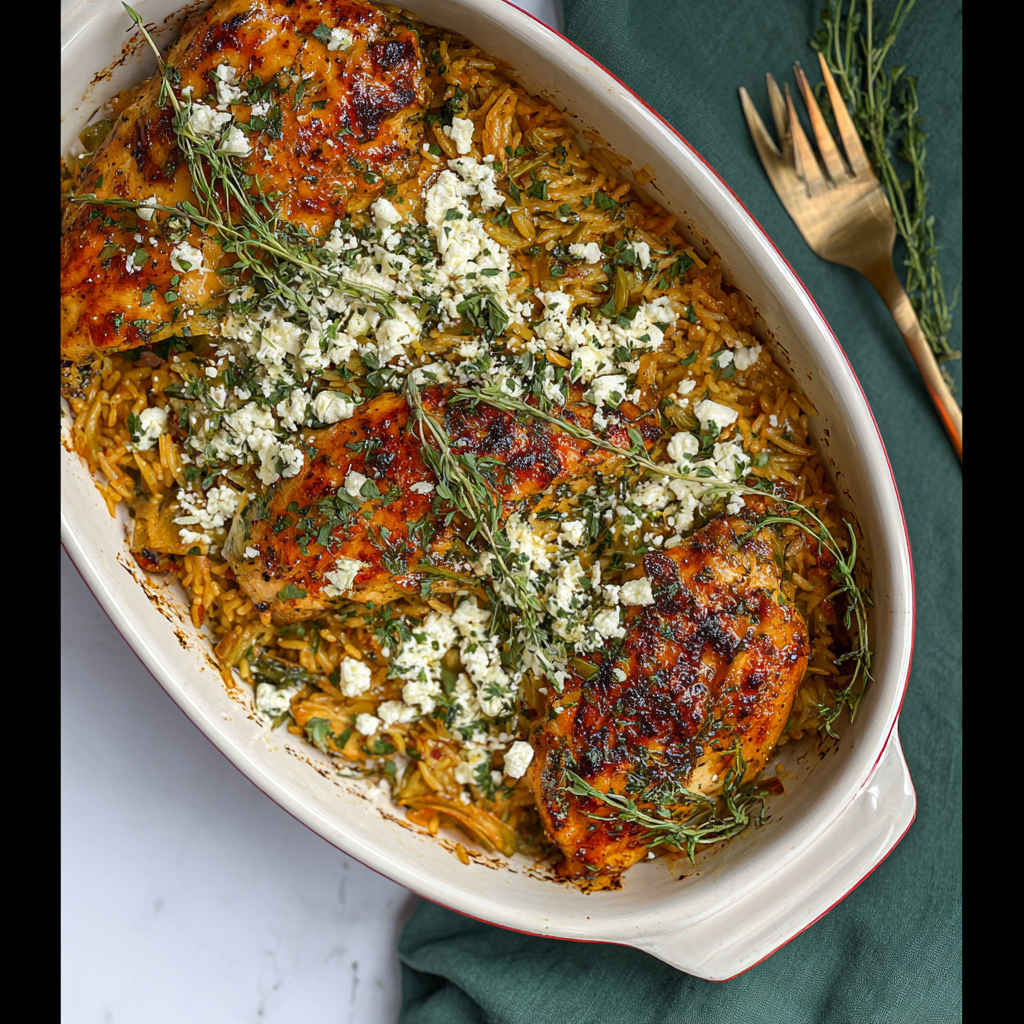
Chicken in Herb Butter with Rice Pilaf
A comforting one-pan meal of tender chicken roasted in herb butter over fragrant jasmine rice pilaf — effortless prep and big fall flavors.
Crispy Cotton Candy Cheesecake Bombs
Golden, fried pockets of creamy cheesecake tucked inside flaky biscuit dough, rolled in sugar and finished with a tuft of fluffy cotton candy — a playful dessert that’s perfect for parties and special occasions.
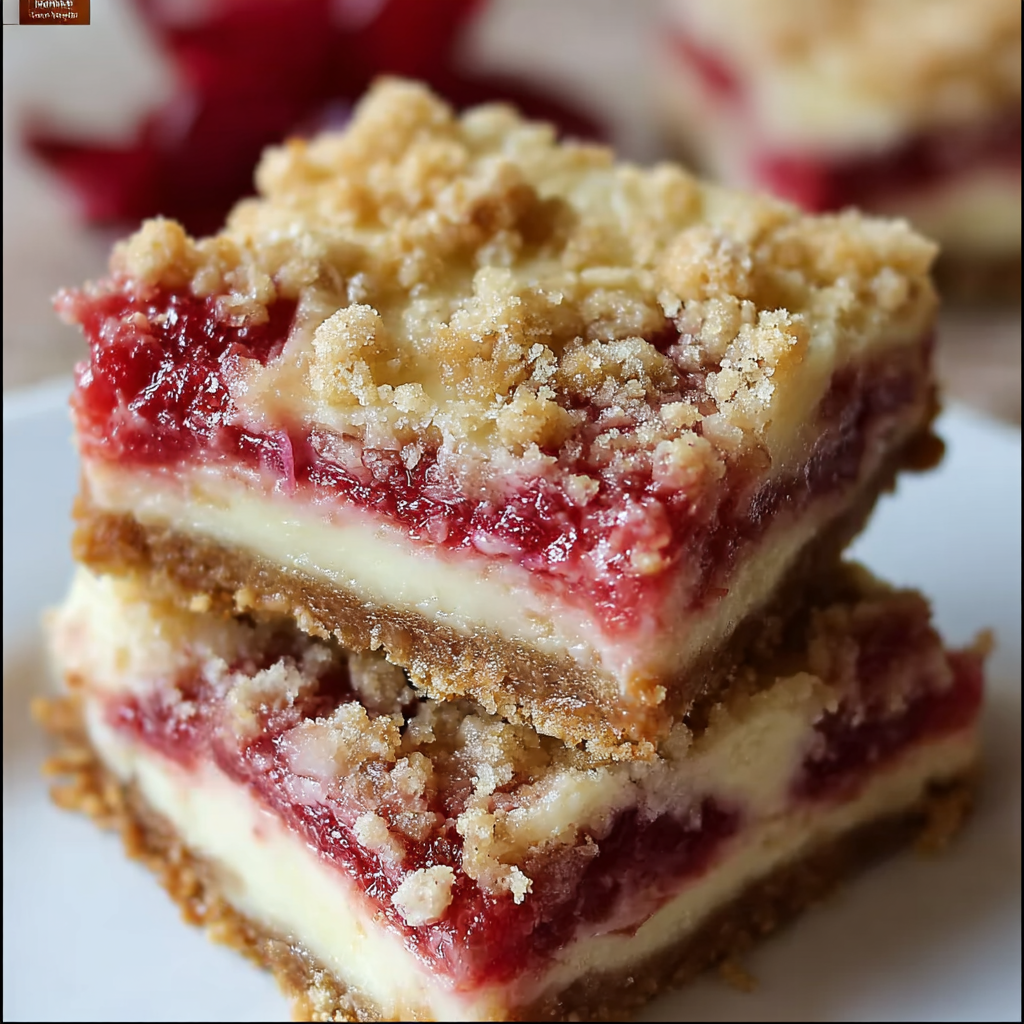
Rhubarb Dessert Bars with Cheesecake and Pecan Crumble
Buttery oat crust layered with smooth cheesecake, bright rhubarb filling, and a crunchy pecan crumble — a nostalgic sweet-tart bar perfect for spring and summer gatherings.
Did You Make This?
Leave a comment & rating below or tag @homecookbites on social media!
Rate This Recipe
Share This Recipe
Enjoyed this recipe? Share it with friends and family, and don't forget to leave a review!
Comments (1)
This recipe looks amazing! Can't wait to try it.
Comments are stored locally in your browser. Server comments are displayed alongside your local comments.
Hi, I'm Emma!
What's Popular

Get My 30-Minute Meals email series!
Quick and easy dinner ideas delivered to your inbox.